Android构建音频播放器教程(一)
下面这篇文章我在国外的网站上看到的,感觉质量很不错,所以就花了一些时间来翻译一下,并且里面也加入了我自己的开发经验,希望这篇文章能够为广大Android开发者提供一个帮助。
在本教程中,我将讨论构建一个简单的播放器,有基本的控件,比如播放、暂停、前进、后退,下一首,前一首,播放列表和进度条。这款应用基本上会读所有的音频文件(mp3)从sdcard,然后播放选中歌曲。对于本教程我引用MediaPlayer类来实现这个App.
Android MediaPlayer Class
Android SDK提供了MediaPlayer这个类在Android里构建媒体服务例如音频,视频的播放等等。在本教程中,我使用下面这个类的功能控制音频播放器。
MediaPlayer mp = new MediaPlayer();
// Set data source -
setDataSource("/sdcard/path_to_song");
// Play audio
mp.start();
// Pause audio
mp.pause();
// Reset mediaplayer
mp.reset();
// Get song length duration - in milliseconds
mp.getDuration();
// Get current duration - in milliseconds
mp.getCurrentDuration();
// Move song to particular second - used for Forward or Backward
mp.seekTo(positon);// position in milliseconds
// Check if song is playing or not
mp.isPlaying();// returns true or false
1. Designing the Audio Player Layout
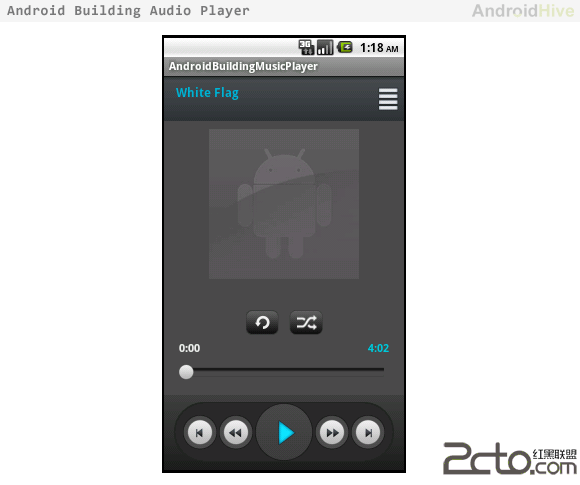
设计你的音频播放器可以使用一些平面设计软件例如photoshop之类,当然这个是专业的要求,因为我们要做的更好。我用photoshop来设计这款应用程序的布局。如果你不想自己设计可以从互联网下载图片使用,下面是一张截图,音频播放器,我们将在本教程中构建。
2. 准备所需的 Icons and Images
一旦你完成了你的应用程序的布局设计,为音频播放器应用程序准备所需的图标和背景图像,准备不同状态下的图标,例如默认,聚焦,按下等等。然后把它们放在drawable文件夹下。
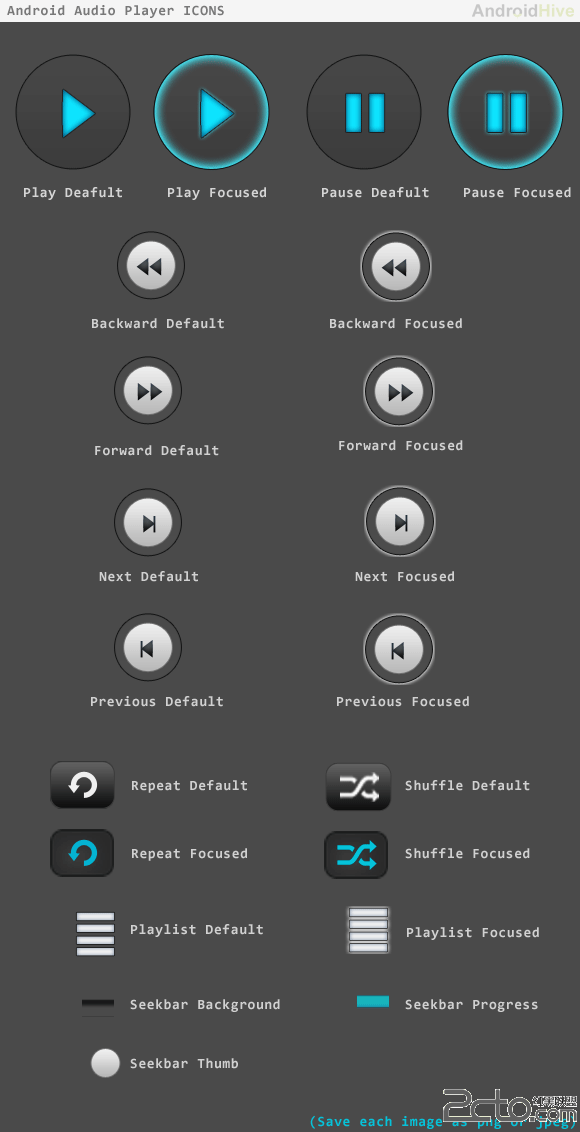
3. 为不同状态的ICON写布局 (默认/聚焦/按下)
在保存所有不同状态的图标之后,我们需要为每一个icon写布局,下面是一个play button的布局,在drawable文件夹下创建并保存。
btn_play.xml
<selectorxmlns:android="http://schemas.android.com/apk/res/android">
<itemandroid:drawable="@drawable/img_btn_play_pressed"
android:state_focused="true"
android:state_pressed="true"/>
<itemandroid:drawable="@drawable/img_btn_play_pressed"
android:state_focused="false"
android:state_pressed="true"/>
<itemandroid:drawable="@drawable/img_btn_play_pressed"
android:state_focused="true"/>
<itemandroid:drawable="@drawable/img_btn_play"
android:state_focused="false"
android:state_pressed="false"/>
</selector>
注意: 其他的icon根据这个例子来写(如btn_pause.xml, btn_next.xml etc,.)
4. 为SeekBar写布局设计
在本教程中,我使用定制的SeekBar显示歌曲的进展,您可以设计默认风格的SeekBar通过使用xml样式。在drawable文件夹下建立xml文件夹并创建
seekbar_progress_bg.xml 这个是改变SeekBar的背景样式(不使用默认的)
<?xmlversion="1.0"encoding="utf-8"?>
<layer-listxmlns:android="http://schemas.android.com/apk/res/android">
<item>
<clip>
<bitmapxmlns:android="http://schemas.android.com/apk/res/android"
android:src="@drawable/img_seekbar_progress_blue"
android:tileMode="repeat"
android:antialias="true"
android:dither="false"
android:filter="false"
android:gravity="left"
/>
</clip>
</item>
</layer-list>
seekbar_progress.xml 这个是改变SeekBar的进度条样式
<?xmlversion="1.0"encoding="utf-8"?>
<layer-listxmlns:android="http://schemas.android.com/apk/res/android">
<itemandroid:id="@android:id/background"
android:drawable="@drawable/img_seekbar_bg"
android:dither="true">
</item>
<itemandroid:id="@android:id/secondaryProgress">
<clip>
<shape>
<gradient
android:startColor="#80028ac8"
android:centerColor="#80127fb1"
android:centerY="0.75"
android:endColor="#a004638f"
android:angle="270"
/>
</shape>
</clip>
</item>
<item
android:id="@android:id/progress"
android:drawable="@drawable/seekbar_progress_bg"
/>
</layer-list>
<?xmlversion="1.0"encoding="utf-8"?>
<layer-listxmlns:android="http://schemas.android.com/apk/res/android">
<itemandroid:id="@android:id/background"
android:drawable="@drawable/img_seekbar_bg"
android:dither="true">
</item>
<itemandroid:id="@android:id/secondaryProgress">
补充:移动开发 , Android ,