用DW MX打造基于ACCESS的ASP.NET留言本 第五章 发表新留言页的制作
第五章    发表新留言页的制作           post.aspx发新留言本页

          操作步骤:

          1、插入表单,切换到代码视图,给表单添加runat="server"属性:
| <form id="form1" method="POST" runat="server" > </form> |
所有的文本域、单选框均与相应的字段名称相同,并且加上runat="server" 属性使其成为服务器控件。代码清单:
| 留言标题:<input name="title" type="text" id="title6" runat="server" > 昵 称:<input name="MessageName" type="text" id="MessageName" runat="server" > 个人主页:<input name="PageUrl" type="text" id="PageUrl" runat="server" > 电子邮箱:<input name="Email" type="text" id="Email" runat="server" > QQ号码: <input name="Qicq" type="text" id="Qicq" runat="server" > 留言内容:<textarea name="MessageBook" cols="70" rows="10" id="MessageBook" runat="server" ></textarea> IP地址:<input name="UserIP" type="hidden" id="UserIP" value="<%= Request.ServerVariables("REMOTE_ADDR")%>" > 发表按扭:<asp:button ID="button1" runat="server" Text="发表" /> 重写按扭:<input type="reset" name="Submit2" value="重写" runat="server" > |
| <a href=### onClick=window.open("face.aspx","face","width=400,height=400,resizable=1,scrollbars=1") title=点击选择头像> <img src="<% if session("face")="" then response.write("face/face14.GIF") else response.write(session("face")) end if%>" width="82" height="90" border=0 id="faceImg"></a> <input name="face" type="hidden" id="face" value="<% if session("face")="" then response.write("face/face14.GIF") else response.write(session("face")) end if%>" > |
| <table width="550" border="0" cellpadding="0" cellspacing="0" > <tr align="Center" valign="Middle" > <td width="595"> <input type=radio name=Miange value=/upload/2007/12/22/20071222231628144.GIF checked > <img src="/upload/2007/12/22/20071222231628144.GIF" border="0" > <input type=radio name=Miange value=/upload/2007/12/22/20071222231628958.GIF> <img src="/upload/2007/12/22/20071222231628958.GIF" border="0" > <input type=radio name=Miange value=/upload/2007/12/22/20071222231628528.GIF> <img src="/upload/2007/12/22/20071222231628528.GIF" border="0" > <input type=radio name=Miange value=/upload/2007/12/22/20071222231628163.GIF> <img src="/upload/2007/12/22/20071222231628163.GIF" border="0" > <input type=radio name=Miange value=/upload/2007/12/22/20071222231628426.GIF> <img src="/upload/2007/12/22/20071222231628426.GIF" border="0" > <input type=radio name=Miange value=/upload/2007/12/22/20071222231628722.GIF> <img src="/upload/2007/12/22/20071222231628722.GIF" border="0" > <input type=radio name=Miange value=/upload/2007/12/22/20071222231628591.GIF> <img src="/upload/2007/12/22/20071222231628591.GIF" border="0" > <input type=radio name=Miange value=/upload/2007/12/22/20071222231629779.GIF> <img src="/upload/2007/12/22/20071222231629779.GIF" border="0" > <input type=radio name=Miange value=/upload/2007/12/22/20071222231629829.GIF> <img src="/upload/2007/12/22/20071222231629829.GIF" border="0" ><span> <input type=radio name=Miange value=/upload/2007/12/22/20071222231629664.GIF> <img src="/upload/2007/12/22/20071222231629664.GIF" border="0" > <input type=radio name=Miange value=/upload/2007/12/22/20071222231628528.GIF> <img src="/upload/2007/12/22/20071222231628528.GIF" border="0" > <input type=radio name=Miange value=/upload/2007/12/22/20071222231629118.GIF> <img src="/upload/2007/12/22/20071222231629118.GIF" border="0" > <input type=radio name=Miange value=/upload/2007/12/22/20071222231629645.GIF> <img src="/upload/2007/12/22/20071222231629645.GIF" border="0" > <input type=radio name=Miange value=/upload/2007/12/22/20071222231629188.GIF> <img src="/upload/2007/12/22/20071222231629188.GIF" border="0" > <input type=radio name=Miange value=/upload/2007/12/22/20071222231629827.GIF> <img src="/upload/2007/12/22/20071222231629827.GIF" border="0" > <input type=radio name=Miange value=/upload/2007/12/22/20071222231629231.GIF> <img src="/upload/2007/12/22/20071222231629231.GIF" border="0" ></td> </tr> </table> |
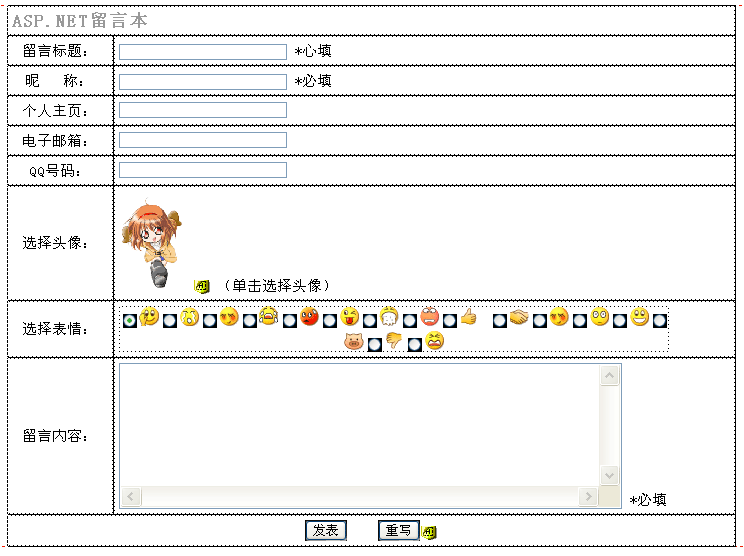
在未添加插入记录行为前,先做好头像选择,用户点击头像后,弹出另一个face.aspx浏览器窗口,以便从中选择头像。这里就不介绍face.aspx的详细制作了,给出整页源代码,你把它复制做成一个页面。
face.aspx文件整页代码清单:
| <%@ Page Language="VB" ContentType="text/html" ResponseEncoding="gb2312" %> <html> <head> <title>选择头像</title> <script> window.focus() function chg(url) { window.opener.document.form1.face.value=url; window.opener.document.form1.faceImg.src=url; } </script> </head> <body> <table align=center width=95% class="table004" cellpadding=5> <tr> <td class=table003 align=center >选择形象(单击即可)</td> <tr> <td class="table001"> <% dim y as integer for y=1 to 37 response.write ("<img src=''''face/face"&(y)&".gif'''' border=0 onclick=""chg(''''face/face"&(y)&".gif'''') "" style=cursor:hand> ") next %> </td> </tr> </table> </body> </html> |
预览页面,可以弹开图像选择窗口,当单击新窗口上的图像时,post.aspx页上的图像也随之改变。
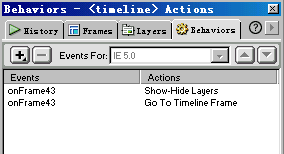
3、添加“插入记录”服务器行为
点击服务器行为面板左边的加号,选择“插入记录”,如果文本域和隐藏域名称与数据库字段名称对相,则DW MX自动匹配好列,如下图,你应该再仔细检一下,各项列和值是否有不匹配的,有的话就将其改正。如下图:
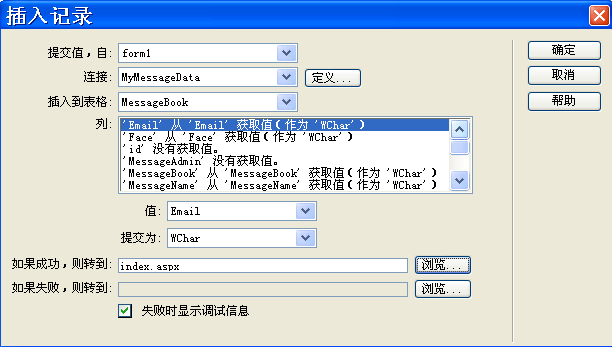
按“确定”按扭保存设置。插入记录成功后,自动转到index.aspx首页。预览页面,输入留言