javascript学习笔记(十一)对表格进行排序(包括数值、字符串、日期等数据类型)
在html" target=_blank>javascript学习笔记(十)中,我们对表格进行了一些美化,主要是实现隔行换色及鼠标经过时高亮两个功能!这样看起来,感觉已经不错了,用户体验要比之前好多了。
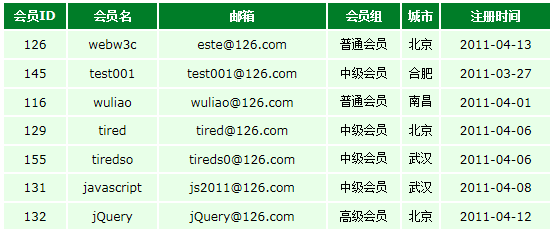
在今天的学习笔记中,我们对表格再改进一些,让用户体验再好一些。我们先看下图:
图1 会员信息表
比如我们现在有图1这样一个表格,在会员组这一列中,需要把相同会员组的排在一起,这样就需要对这个表格进行一些排序的操作。下面我们就来一步一步实现这个需求:
基本原理:首先提取会员组这列的值,然后存储在一个数组中,然后利用arrayObject.sort()方法对其排序,排序的结果先保存在一个临时的代码片段中(documentFragment),最后把新的排序结果替换掉之前的单元格,最终实现排序的功能。
javascript部分代码:
view sourceprint?01 //用于sort排序的比较函数02 function compareTrs(tr1, tr2) {
03 var value1 = tr1.cells[3].innerHTML;
04 var value2 = tr2.cells[3].innerHTML;
05 //var value1 = tr1.cells[3].firstChild.nodeValue; //两种方式都可以取得表格中单元格的值
06 //var value2 = tr2.cells[3].firstChild.nodeValue;
07 return value1.localeCompare(value2);
08 }
09
10 //对表格进行排序
11 function sortTable(tableId) {
12 var table = document.getElementById(tableId);
13 var tbody = table.tBodies[0];
14 var tr = tbody.rows;
15
16 var trValue = new Array();
17 for (var i=0; i<tr.length; i++ ) {
18 trValue[i] = tr[i]; //将表格中各行的信息存储在新建的数组中
19 }
20
21 trValue.sort(compareTrs); //进行排序
22
23 var fragment = document.createDocumentFragment(); //新建一个代码片段,用于保存排序后的结果
24 for (var i=0; i<trValue.length; i++ ) {
25 fragment.appendChild(trValue[i]);
26 }
27
28 tbody.appendChild(fragment); //将排序的结果替换掉之前的值
29 }
然后我们在html代码中添加动作事件:
view sourceprint?01 <table summary="user infomation table" id="tableSort">02 <thead>
03 <tr>
04 <th>会员ID</th>
05 <th>会员名</th>
06 <th>邮箱</th>
07 <th onclick="sortTable(tableSort)" style="cursor: pointer;">会员组</th>
08 <th>城市</th>
09 <th>注册时间</th>
10 </tr>
11 </thead>
12 <tbody>
13 ……
14 </tbody>
15 </table>
请看完整示例1:
show sourceview sourceprint?001 <!DOCTYPE html PUBLIC "-//W3C//DTD XHTML 1.0 Transitional//EN" "http://www.w3.org/TR/xhtml1/DTD/xhtml1-transitional.dtd">002 <html xmlns="
http://www.w3.org/1999/xhtml"><head>003 <meta content="text/html; charset=UTF-8" http-equiv="Content-Type">
004 <title>sort table -- by zhangchen</title>
005 <style type="text/css">
006 * {
007 padding:0;
008 margin:0;
009 }
010
011 body {
012 font-family:verdana;
013 font-size:12px;
014 }
015
016 .content {
017 width:550px;
018 margin:20px auto;
019 }
020
021 .content h1 {
022 font-family:微软雅黑;
023 font-size:18px;
024 padding-bottom:5px;
025 }
026
027 table {
028 width:100%;
029 }
030
031 th, td {
032 padding:6px 0;
033 text-align:center;
034 }
035
036 th {
037 background-color:#007D28;
038 color:#ffffff;
039 }
040
041 tr {
042 background-color:#E8FFE8;
043 }
044
045 .odd {
046 background-color:#FFF3EE;
047 }
048
049 .highlight {
050 background-color:#FFF3EE;
051 }
052
053 </style>
054
055 <script type="text/javascript">
056
057 //动态给js添加class属性
058 function addClass(element, value) {
059 if(!element.className) {
060 &nbs
补充:web前端 , JavaScript ,