Hive两种模式安装
数据仓库工具,可以把Hadoop下的原始结构化数据变成Hive中的表。
支持一种与SQL几乎完全相同的语言HiveQL,除了不支持更新、索引和事务。
可以看成是从SQL到Map-Reduce的映射器。
提供shell、JDBC/ODBC、thrift、Web等接口。
一、内嵌模式安装
这样安装的元数据保持在内嵌的Derby数据库中,只能允许一个会话连接,只适用于简单的测试。
1、解压Hive
[coder@h1 ~]$ tar -zxvf hive-0.10.0.tar.gz
2、配置环境变量/etc/profile
加入Hive的安装目录,并把Hive的bin目录配置到PATH
HIVE_HOME=/home/coder/hive-0.10.0
PATH=$HADOOP_INSTALL/bin:$PIG_INSTALL/bin:$JAVA_HOME/bin:$HIVE_HOME/bin:$PATH
执行 source /etc/profile命令,使得配置生效
3、新建Hive所需目录
在HDFS上建立/tmp和/user/hive/warehouse目录,并赋予组用户写权限。这是Hive默认的数据文件存放目录,可以在hive-site.xml文件中配置。
[coder@h1 hadoop-0.20.2]$ bin/hadoop fs -mkdir /tmp
[coder@h1 hadoop-0.20.2]$ bin/hadoop fs -mkdir /user/hive/warehouse
[coder@h1 hadoop-0.20.2]$ bin/hadoop fs -chmod g+w /tmp
[coder@h1 hadoop-0.20.2]$ bin/hadoop fs -chmod g+w /user/hive/warehouse
4、输入hive命令,出现类似下面的内容,说明安装成功。
[coder@h1 hadoop-0.20.2]$ hive
Logging initialized using configuration in jar:file:/home/coder/hive-0.10.0/lib/hive-common-0.10.0.jar!/hive-log4j.properties
Hive history file=/tmp/coder/hive_job_log_coder_201305072118_1272944282.txt
hive>
hive> show tables;
OK
Time taken: 24.479 seconds
hive> exit;
二、独立模式安装
支持多用户会话,需要一个独立的元数据库,常用的是使用MySQL作为元数据库。
1、启动MySQL
[root@h1 ~]# service mysqld start
Starting mysqld: [ OK ]
[root@h1 ~]#
2、为Hive建立相应的MySQL账号
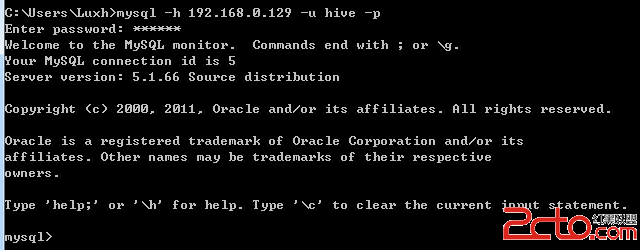
[root@h1 ~]# mysql
Welcome to the MySQL monitor. Commands end with ; or \g.
Your MySQL connection id is 2
Server version: 5.1.66 Source distribution
Copyright (c) 2000, 2012, Oracle and/or its affiliates. All rights reserved.
Oracle is a registered trademark of Oracle Corporation and/or its
affiliates. Other names may be trademarks of their respective
owners.
Type 'help;' or '\h' for help. Type '\c' to clear the current input statement.
mysql> create user 'hive' identified by '123456';
Query OK, 0 rows affected (0.00 sec)
mysql> GRANT ALL PRIVILEGES ON *.* TO 'hive'@'localhost' IDENTIFIED BY '123456' WITH GRANT OPTION;
Query OK, 0 rows affected (0.00 sec)
mysql> flush privileges;
Query OK, 0 rows affected (0.00 sec)
mysql> exit
Bye
[root@h1 ~]#
然后从客户端用hive账号登陆MySQL
3、建立Hive专用元数据库
mysql>create database hive;
4、配置Hive
在Hive安装目录的conf目录下,将hive-default.xml.template复制一份命名为:hive-site.xml
修改以下内容,配置上mysql数据连接、驱动、用户名和密码
<property>
<name>javax.jdo.option.ConnectionURL</name>
<value>jdbc:mysql://localhost:3306/hive?createDatabaseIfNotExist=true</value>
</property>
<property>
<name>javax.jdo.option.ConnectionDriverName</name>
<value>com.mysql.jdbc.Driver</value>
</property>
<property>
<name>javax.jdo.option.ConnectionUserName</name>
<value>hive</value>
</property>
<property>
<name>javax.jdo.option.ConnectionPassword</name>
<value>123456</value>
</property>
5、把mysql的驱动包拷贝到Hive安装路径下的lib目录
6、进入Hive,没报错说明独立模式安装成功
[coder@h1 ~]$ hive
Logging initialized using configuration in jar:file:/home/coder/hive-0.10.0/lib/hive-common-0.10.0.jar!/hive-log4j.properties
Hive history file=/tmp/coder/hive_job_log_coder_201305072212_717503278.txt
hive> show tables;
OK
Time taken: 24.783 seconds
hive> exit;